
Fried Dough
Fried Dough
Finding the perfect balance between living a healthy lifestyle and indulging in your favorite culinary comforts is an art form. Welcome back to Good Food Remedies, where our primary mission is to guide you toward optimal wellness. While our homepage is packed with guidance on holistic living and healthy food, we also believe that true wellness includes the joy of occasional indulgences. Life is meant to be savored, and depriving yourself entirely of your favorite treats can actually hinder your long-term wellness goals. Today, we are taking a step away from our usual strictly healthy recipes to celebrate a nostalgic, soul-warming classic: the ultimate fried dough recipe.
Think of this as an exploration of culinary “street couture”—taking a beloved, humble street food and elevating it in your own kitchen with high-quality ingredients and mindful preparation. Whether you remember eating this at a vibrant summer carnival, a local fairground, or from a bustling street vendor, this recipe brings that magic right to your home. We will teach you how to make it perfectly, and along the way, we’ll discuss how to incorporate a treat like this into a balanced life, touching on concepts like maintaining a calorie deficit without sacrificing joy.
Why You’ll Love This Recipe
There is something inherently magical about watching a simple mixture of flour, water, and yeast transform into a golden, puffed-up pillow of deliciousness. You will love this recipe because it is incredibly forgiving, beautifully rustic, and universally beloved. It acts as a blank canvas for whatever flavors you are craving—whether that is a dusting of classic powdered sugar, a drizzle of rich maple syrup, or a savory garlic and herb butter.
More importantly, taking the time to knead dough and fry it fresh can be a surprisingly mindful activity. In the realm of holistic wellness, stress management is just as critical as your physical diet. Cooking and baking force you to slow down, be present, and engage your senses. While we often talk about specific foods that help you manage stress—like leafy greens, berries, and omega-3 rich fish—the act of preparing a comforting family recipe is a psychological stress-reliever in its own right. It gathers people, stimulates happiness, and generates enduring memories.
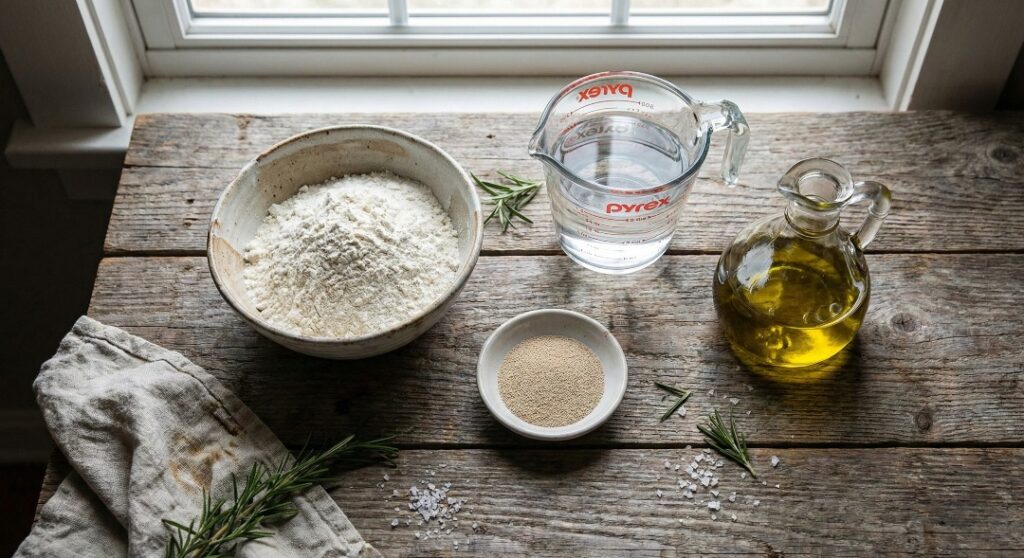
Ingredients & Substitutes
To create the perfect, airy texture, you need a precise combination of basic pantry staples. Here is what you need, along with some mindful substitutions if you are keeping an eye on your macro-nutrients or adhering to a specific dietary protocol like a protein diet.
- The foundation of our dough is all-purpose flour. It provides the right amount of gluten for chewiness. Substitute: For a slight fiber boost, you can swap up to half of the all-purpose flour with white whole wheat flour.
- Active Dry Yeast: This is what gives the dough its lift and signature flavor.
- Warm Water (105°F – 115°F): Crucial for activating the yeast.
- Granulated Sugar: A tiny bit feeds the yeast and helps it brown.
- Salt: Required for flavor balance. Do not skip this!
- Olive Oil: Added to the dough for tenderness.
- Frying Oil: You need an oil with a high smoke point. Best options are canola, vegetable, or peanut oil. Mindful tip: If you are focusing on weight loss, remember that frying adds calories. Use a thermometer to ensure the oil is exactly at 350°F; if the oil is too cool, the dough absorbs excess fat.
Taste & Texture
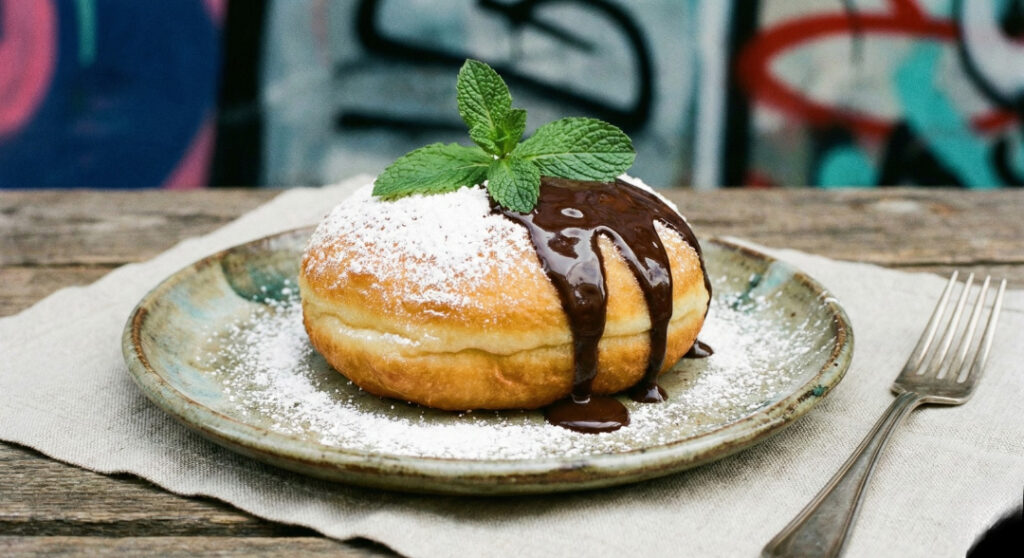
When executed correctly, this fried dough is a masterpiece of textural contrast. The exterior is deeply golden brown, boasting a delicate, shatteringly crisp crust that instantly gives way when you bite into it. Inside, the crumb is incredibly light, airy, and slightly chewy, resembling a freshly baked artisan bread.
The taste of the dough itself is beautifully neutral with a subtle, complex yeasty undertone—much like a high-quality pizza crust. Because the base is not overly sweet, it readily accepts whatever toppings you choose to adorn it with. It tastes like pure comfort, evoking memories of summer nights and boardwalk strolls.
How to Make
Achieving that perfect “street couture” quality at home requires following a few simple but essential steps. Do not rush the process; let the yeast do its important work.
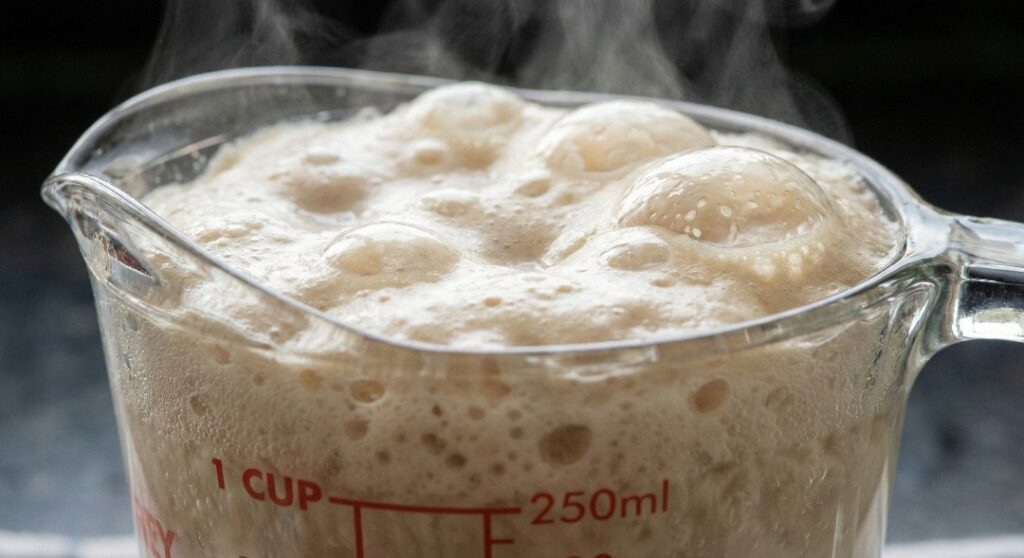
Step 1
Activate the Yeast. Mix a pinch of sugar with warm water and active dry yeast. Let it rest for 5 to 10 minutes after lightly stirring. The mixture should become frothy and bubble up. If it doesn’t, your yeast is likely expired, and you will need to start over with fresh yeast to ensure your dough rises.
Step 2
Mix the Dry Ingredients. Combine the all-purpose flour, salt, and residual sugar in a big mixing basin (or the bowl of a stand mixer). Whisking ensures the salt and sugar are evenly distributed throughout the flour, which is vital for an even rise and consistent flavor.
Step 3
Combine Wet and Dry. Make a well in the midst of your dry ingredients. Pour in the olive oil and the frothy yeast mixture. Use a wooden spoon or a sturdy spatula to stir the mixture until a shaggy, rough dough begins to form.
Step 4
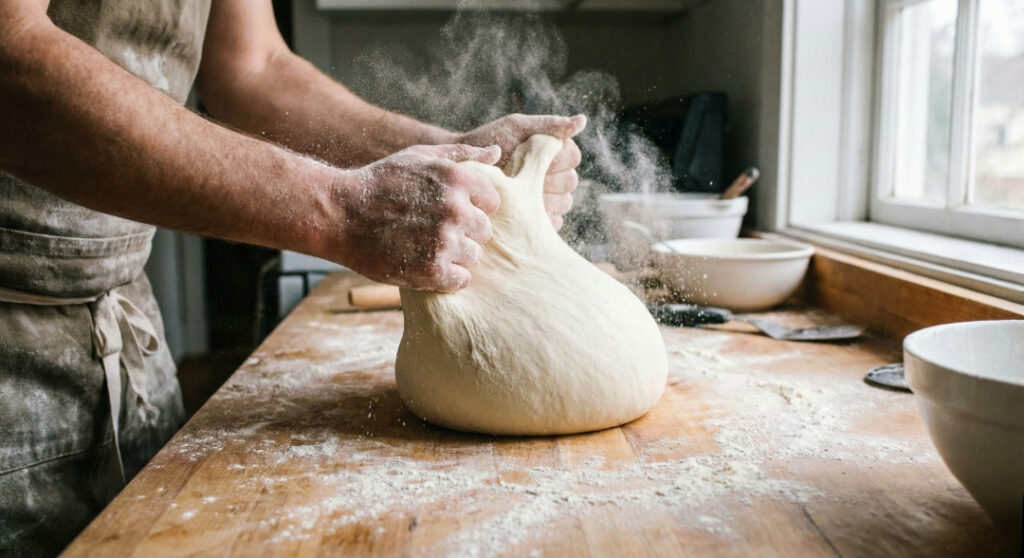
Knead the Dough. Dump the sloppy dough onto a surface that has been lightly floured. Knead the dough with the heels of your hands for about 5 to 8 minutes.You seek a flexible, smooth texture. If the dough is overly sticky, add a sprinkle of flour, one tablespoon at a time. If you are using a stand mixer, use the dough hook on medium-low speed for about 5 minutes.
Step 5
First Rise. Lightly oil a large, clean bowl. Place your kneaded dough into the bowl, turning it once so the top is lightly coated in oil (this prevents a dry skin from forming). Tightly wrap the bowl with plastic wrap or a moist kitchen towel. Keep it in a warm, draft-free area and let it rise for one to one and a half hours, or until it has doubled in size.
Step 6
Punching Down. Once the dough has doubled, gently punch it down in the center to release the built-up air bubbles (carbon dioxide). Move it back out to your gently floured surface.
Step 7
Portioning the Dough. Using a bench scraper or a sharp knife, divide the dough into 6 to 8 equal pieces. Roll every bit into a small, tight ball. Cover the balls with your kitchen towel and let them rest for 10 minutes. This relaxes the gluten, making them much easier to shape.
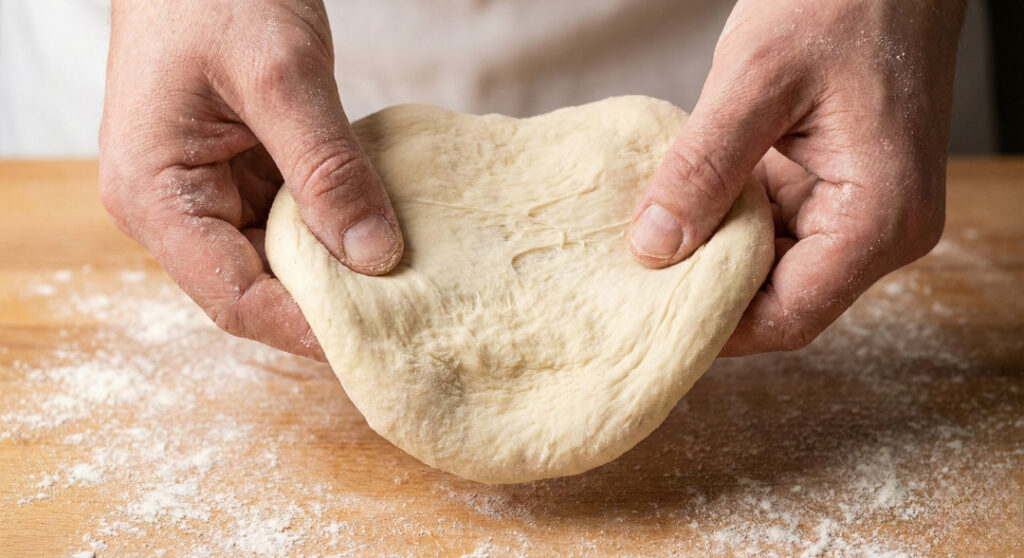
Step 8
Shaping the Discs. Take one dough ball and use your hands to gently stretch and pull it into a rustic, flat circle, about 6 to 8 inches in diameter. You want the edges to be somewhat thicker than the center. Don’t worry if they aren’t perfectly round; the rustic shape is part of the charm!
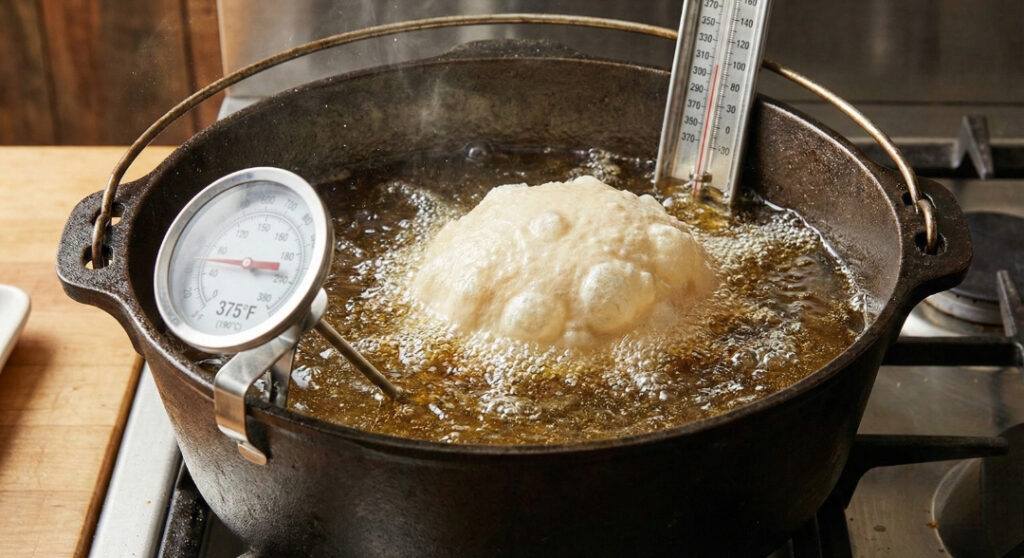
Step 9
Heating the Oil. Pour about 1.5 to 2 inches of your chosen frying oil into a heavy-bottomed Dutch oven or a deep cast-iron skillet. Attach a deep-fry thermometer and heat the oil over medium-high heat until it reaches exactly 350°F (175°C). Temperature control is the secret to a non-greasy result.
Step 10
Frying the First Side. Carefully slide one shaped dough disc into the hot oil. It should immediately begin to bubble and puff up. Fry for about 1 to 2 minutes, using a spider strainer or tongs to occasionally baste the top of the dough with hot oil to encourage puffing.
Step 11
Frying the Second Side. Once the bottom is a deep golden brown, carefully flip the dough over. Fry for another 1 to 2 minutes on the second side until evenly browned and crisp.
Step 12
Draining and Topping. Use your spider strainer to remove the fried dough from the oil, allowing excess oil to drip back into the pot. Transfer the dough to a wire cooling rack set over paper towels. Apply your toppings (like cinnamon sugar) immediately while the dough is still hot so they adhere properly.
Expert Tips for Success
Creating the ultimate treat requires attention to detail. Here are some professional advices to guarantee success every time:
- Thermometer is Key: Never guess the oil temperature. If it is too low, the dough will act like a sponge and absorb oil, becoming heavy and greasy. If it is too high, the outside will burn before the inside is fully cooked. Keep it steady at 350°F.
- Don’t Roll; stretch with your hands the dough rather than using a rolling pin. A rolling pin will push out all the beautiful air bubbles the yeast worked so hard to create.
- Balance Your Intake: Enjoying foods like this is perfectly fine when approached with mindfulness. If you are learning how to lose belly fat, the key is not deprivation, but portion control and overall daily energy balance. You can absolutely enjoy half a piece of fried dough and stay completely aligned with your health goals.
Flavor Variations & Add-Ins
The beauty of this recipe is its versatility. You can take this basic canvas and dress it up to suit your mood:
- The Classic: Tossed generously in a paper bag with cinnamon and granulated sugar.
- The Canadian (Beavertail style): Smeared with chocolate hazelnut spread and topped with sliced bananas.
- The Savory Twist: Brushed with melted garlic butter, dusted with grated Parmesan cheese, and sprinkled with fresh parsley.
- The Berry Delight: Topped with a dollop of Greek yogurt and fresh mixed berries. This is a great way to add some micro-nutrients back into your treat!
How to Serve & Store
Serving: Fried dough is unequivocally best served immediately, straight from the fryer, while it is still warm, crisp, and giving off steam. Serve it alongside a fresh fruit salad or a cup of hot black coffee to balance the richness.
Storage: If you have any food left over, keep it in a sealed container at room temperature for two days. To revive them, pop them in an air fryer at 320°F for 3 minutes, or in a 350°F oven for 5 minutes. Do not microwave them, as they will become tough and chewy.
A note on late-night snacking: While it might be tempting to save a piece for midnight, fried foods are heavy on digestion before bed. If you are hungry later in the evening, we highly recommend checking out our guide on the best food to eat at night for weight loss, which features sleep-promoting, easily digestible options like cottage cheese or a handful of almonds.
Fry Bread Versus Fried Dough
You might hear the terms “fry bread” and “fried dough” used interchangeably, but they are historically and culinarily distinct.
- Fried Dough (what we made today) utilizes a yeast-leavened dough. It requires kneading and rising time, resulting in a bread-like, airy interior with a distinct yeast flavor. It is closely associated with European and Italian-American fair foods (often called zeppole or pizza frita).
- Fry Bread is deeply rooted in Native American history and culture. It is typically made with baking powder as the leavening agent instead of yeast. Because it requires no rising time, it is faster to make and results in a denser, slightly more biscuit-like texture inside. It is frequently the foundation of “Indian Tacos.”
Frequently Asked Questions (FAQs)
Is it possible to prepare dough ahead of time? Yes! You can complete the recipe up to Step 5 (First Rise). Instead of letting it rise on the counter, place the covered bowl in the refrigerator overnight. The cold slows down the yeast, creating a slow fermentation that actually improves the flavor. Let the dough come to room temperature for about an hour before punching it down and shaping.
Can I bake this instead of frying? While you can bake the dough at 400°F for about 12-15 minutes, it will essentially just be flatbread or pita bread. It will lack the signature crunch, blistered exterior, and rich flavor that only hot oil can provide.
Can I use an air fryer? Yes, but with caveats. Brush the stretched dough generously with oil and air fry at 375°F for about 5-7 minutes, flipping halfway. It will be lighter and less greasy, but the texture will be slightly drier than traditional deep-frying.
Is fried dough suitable for a vegan diet? Yes! This specific dough recipe contains no dairy or eggs, making it naturally vegan. Just ensure your chosen toppings (like butter or certain chocolates) are also plant-based.
Equipment Needed
To make this recipe smoothly and safely, ensure you have the following kitchen tools:
- Large mixing bowls
- Measuring spoons and cups
- Wooden spoon or robust spatula
- Heavy-bottomed Dutch oven or deep cast-iron skillet
- Deep-fry thermometer (Very Important)
- Spider strainer or heat-safe slotted spoon
- Wire cooling rack
- Paper towels
You May Also Enjoy
If you loved this deep dive into homemade comfort foods, be sure to explore more of our content. Discover how to balance treats with wholesome meals in our expansive Recipes section, or take a deeper dive into wellness with our articles on mindful eating and sustainable living.
Fried Dough
Here is your printable, easy-to-follow recipe card. Let’s get cooking once your materials are gathered!
Ingredients
- 3 cups All-purpose flour (additional for dusting)
- 1 packet (2 ¼ tsp) Active dried yeast
- 1 cup Warm water (105°F – 115°F)
- 2 tbsp Granulated sugar (separated)
- 1 teaspoon Fine sea salt
- 1 spoonful Extra virgin olive oil
- 4 cups Frying oil (From Canola, vegetable, or peanut oil)
- Optional toppings: Cinnamon sugar, powdered sugar, maple syrup, marinara sauce, garlic butter.
Instructions
- Activate: In a little bowl, combine lukewarm water, yeast, and 1 teaspoon of sugar. Allow 5–10 minutes for frothy.
- Combine: Whisk together flour, leftover sugar, and salt in a big basin. Create a well in the middle; combine yeast mixture and olive oil. Stir till a scruffy dough results.
- Knead: Turn onto a surface covered with flour. Knead five to eight minutes until smooth and springy.
- Rise: Cover and let dough rise in a warm location for 1–1.5 hours until doubled in a softly oiled bowl.
- Shape: Make dough flat. Divide into six to eight parts. Roll into balls, rest for 10 minutes, then stretch each ball into a 6-inch rustic disc.
- Fry: Heat oil in a Dutch oven to 350°F. Fry dough discs one at a time for 1-2 minutes per side until golden brown and puffed.
- Serve: Remove with a slotted spoon, drain briefly on a wire rack, and immediately toss in your preferred toppings. Serve hot!
Notes
- Oil Temperature: Do not overcrowd the pot, or the oil temperature will drop. Fry one or two pieces at a time maximum.
- Storage: Should be consumed fresh. Reheat leftovers in a 350°F oven for 5 minutes.
- Make-Ahead: Dough can be refrigerated during the first rise for up to 24 hours. Before shaping, let come to room temperature.
Nutrition
(Estimates per serving, plain dough without toppings. Note: Frying oil absorption varies wildly based on temperature control.)
- Calories: 210 kcal
- Carbohydrates: 37 g
- Protein: 5 g
- Fat: 4 g (varies by frying absorption)
- Sodium: 290 mg
- Fiber: 1.5 g
- Sugar: 3 g