The Best Chocolate Chip Cookie Recipe Ever
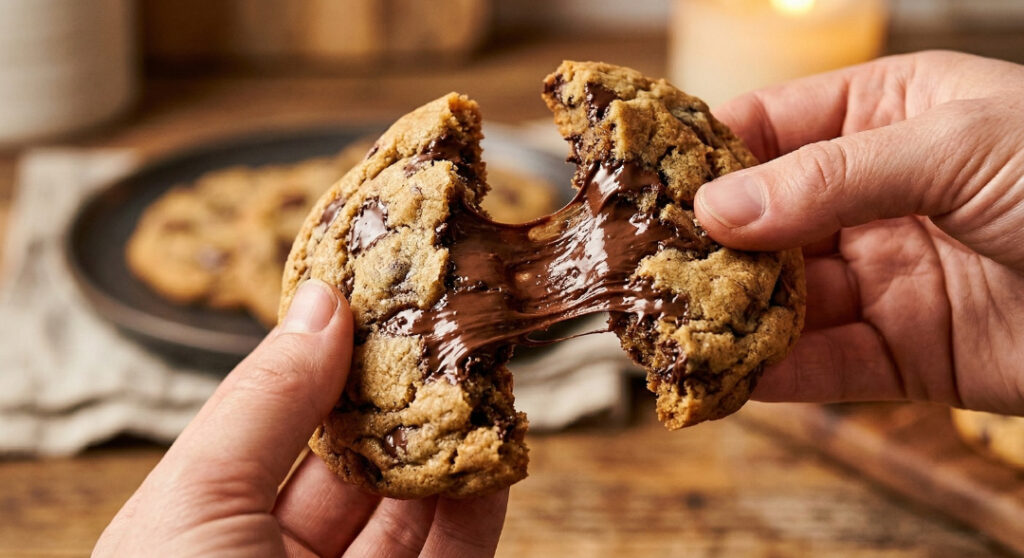
Welcome to Good Food Remedies, where we believe that a little bit of sweetness is the ultimate cure for a long day. If you have been searching the internet tirelessly for the absolute best chocolate chip cookie recipe, your journey ends right here. We have spent countless hours in the kitchen testing, tweaking, and tasting to develop a masterpiece. These cookies have it all: delightfully crispy, buttery edges, a soft, chewy, and gooey center, puddles of rich, molten chocolate throughout, and a sophisticated finish of flaky sea salt that perfectly balances the sweetness.
Baking is an exact science, but it is also an art form. The perfect cookie requires the right ratio of sugars, the correct temperature of butter, and an understanding of how ingredients like baking soda (sometimes accidentally typed by eager bakers as baking soda, but we know what you mean!) interact with the acidic components of your dough. This comprehensive guide will walk you through every single step, ensuring that whether you are a novice baker or a seasoned pastry chef, you will pull a tray of absolute perfection out of your oven every single time.
Get ready to fill your home with the intoxicating aroma of vanilla, butter, and baking chocolate. Let’s dive into the anatomy of the greatest cookie you will ever eat.
How to Make Chocolate Chip Cookies
Making chocolate chip cookies from scratch might seem straightforward, but the difference between a “good” cookie and a “mind-blowing” cookie lies entirely in the technique. The process is a delicate dance of chemistry and temperature control. Understanding why we do things a certain way will elevate your baking game forever.
The general process involves creating a base of creamed butter and sugar, adding your binding agents (eggs) and flavorings (vanilla), gently incorporating the dry ingredients, and finally, folding in the star of the show: the chocolate. But within these broad strokes are micro-steps that dictate the final texture and flavor profile of your cookies. Let’s break down the method so you can achieve bakery-style results right in your own kitchen.

Make the Chocolate Chip Cookie Dough
The foundation of the best chocolate chip cookie recipe begins with the dough. Start by whisking together your dry ingredients in a medium-sized bowl: all-purpose flour, baking soda, and fine salt. Whisking aerates the flour and ensures that the leavening agent is evenly distributed. This prevents some cookies from rising beautifully while others fall flat.
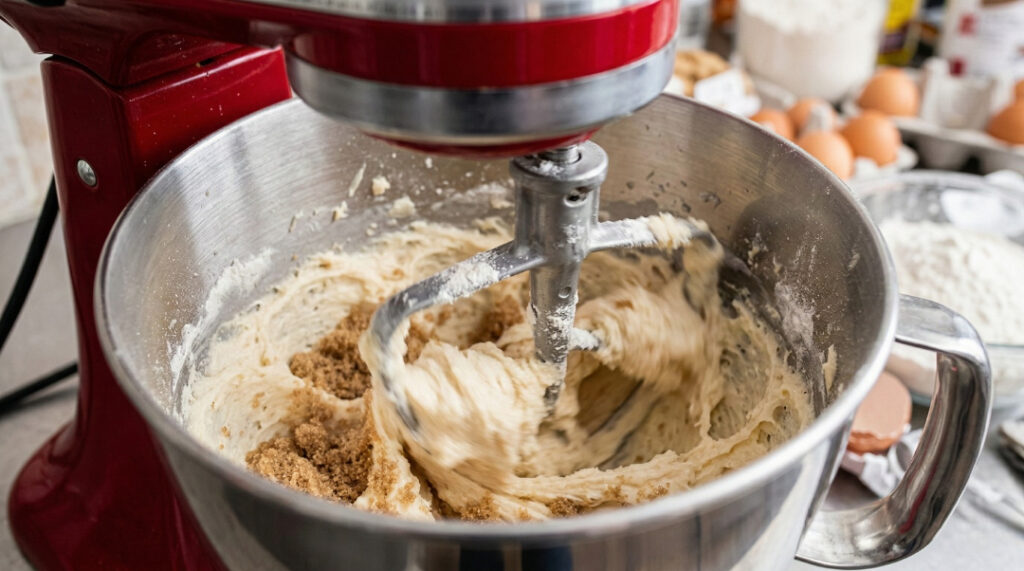
In a separate, larger bowl (or the bowl of a stand mixer), you will cream together the softened unsalted butter, packed dark brown sugar, and granulated white sugar. Creaming isn’t just about combining ingredients; it is a mechanical process of whipping air into the butter. Fragments of sugar slice through the fat, trapping small bubbles inside. When the cookies hit the hot oven, the baking soda reacts, and the steam expands these air pockets, giving your cookies a beautiful lift. You should beat the butter and sugars for at least 2 to 3 minutes until the mixture is pale, light, and fluffy.
A single egg goes in next – wait until it blends fully before adding another. Watch how the mixture changes with every stir. Room-temperature eggs emulsify much better into the butter mixture than cold eggs, preventing the batter from breaking or curdling. A full measure of clear vanilla essence blends into the mix.
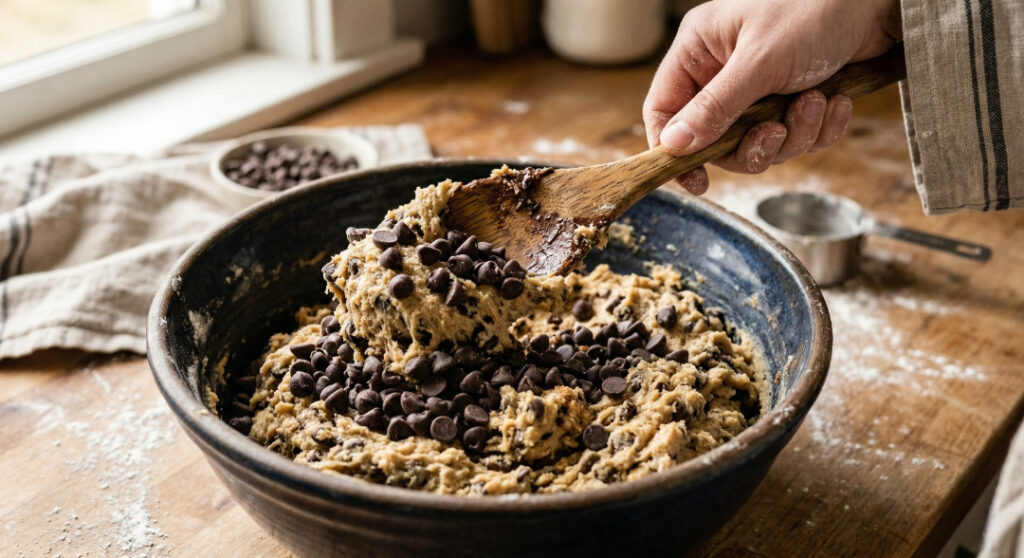
Pour the dry mix into the bowl while stirring gently. Gradually let it blend with what’s already there. A key point stands clear – excessive mixing brings unwanted results. Work just enough for integration without going further. Once the flour touches the liquid, gluten begins to form. Overmixing will lead to tough, bread-like cookies instead of tender, chewy ones. A few traces of flour should stay showing. That is when you pause the mixing. Finally, fold in an absurd amount of high-quality chocolate chips or chunks.
Portion & Roll Dough
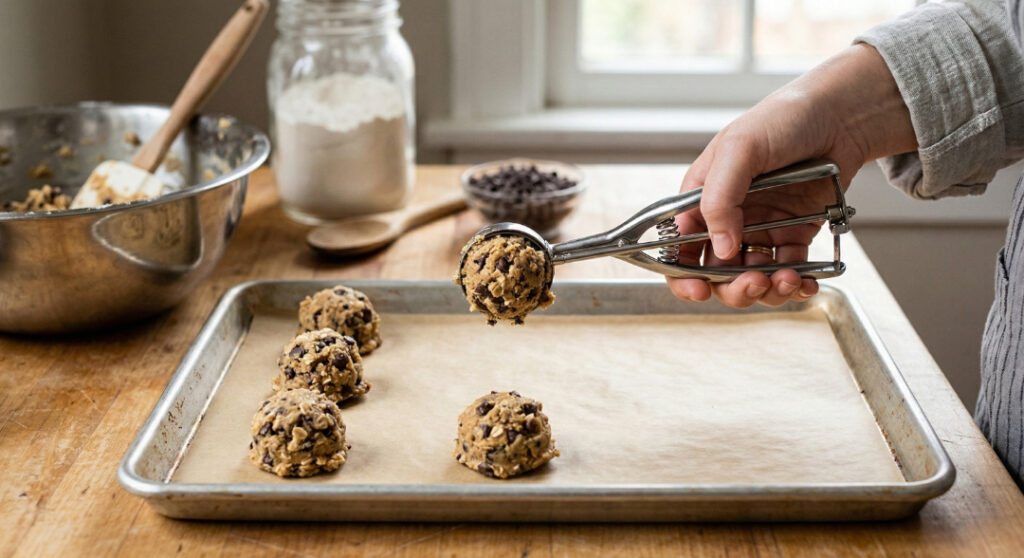
Baking works best when you stick to the routine. If your cookies are all different sizes, the smaller ones will burn while the larger ones remain raw in the middle. To ensure uniform baking, use a spring-loaded cookie scoop. A 2-tablespoon or 3-tablespoon scoop is ideal for bakery-sized cookies.
Scoop the dough and roll it gently between your palms to create a perfectly smooth sphere. If you want those picture-perfect puddles of chocolate on top, press a few extra chocolate chips onto the outside of the dough balls after you roll them. At this stage, you have a crucial choice to make: bake them immediately, chill the dough, or freeze it for later. (Spoiler alert: chilling or freezing is the secret to next-level flavor).
How To Freeze Cookie Dough:
One of the greatest gifts you can give your future self is a stash of homemade cookie dough in the freezer. Freezing cookie dough not only provides you with on-demand desserts, but the resting period actually improves the cookies. As the dough sits, the flour fully hydrates, absorbing the moisture from the eggs and butter. This breaks down enzymes in the flour, resulting in a deeper, more complex caramel flavor and a chewier texture.
To freeze the dough:
- Portion and roll the dough into balls as instructed above.
- Place the rolled balls onto a parchment-lined baking sheet, packing them close together (they don’t need to be spread out because you aren’t baking them yet).
- Put the baking sheet into the freezer for 1 to 2 hours, or until the dough balls are completely solid.
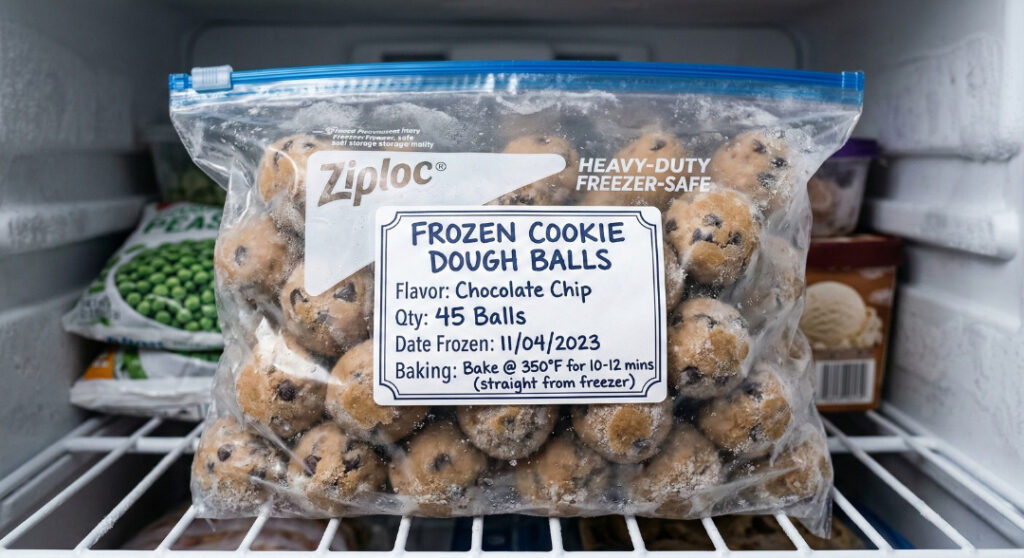
- Transfer the solid dough balls into a heavy-duty, zip-top freezer bag or an airtight freezer-safe container.
- Label the bag with the date and the baking instructions. The dough will stay fresh in the freezer for up to 3 months.
How to Bake Frozen Dough
Craving cookies but only having frozen dough? No problem. You do not even need to thaw the dough before baking. In fact, baking straight from the freezer can yield a thicker cookie because the cold dough takes longer to spread in the oven.
To bake frozen dough, simply preheat your oven to the temperature stated in the recipe (usually 350°F or 175°C). Place the frozen dough balls onto a parchment-lined baking sheet, spacing them about 2 inches apart. You will need to add 2 to 3 minutes to the original baking time. Watch closely as those last minutes tick by. You are looking for golden brown edges and a center that is just beginning to set.
Bake Until they just barely look done
This is perhaps the most critical rule in cookie baking, and the number one reason why people end up with hard, crunchy cookies when they want soft, chewy ones. You must remove the cookies from the oven when they just barely look done.
When you peer through the oven window, the edges should be a light golden brown and perfectly set. However, the center should still look slightly puffed, soft, and perhaps even a tiny bit raw or underbaked. This is exactly what you want. Do not wait for the center to look fully baked before taking them out. If you do, they will be overbaked by the time they cool.
Cool
Why do we take them out when they look underbaked? Because of a culinary phenomenon known as “carry-over cooking.” When you remove the baking sheet from the oven, the pan is still blazing hot, and the internal temperature of the cookies continues to cook the dough.
Five full minutes must pass before you move the cookies from the warm tray. During this time, the centers will deflate slightly and finish baking gently, creating that dense, fudgy, chewy interior we all crave. After 5 minutes, use a thin spatula to carefully transfer the cookies to a wire cooling rack. The wire rack allows air to circulate underneath the cookies, stopping the cooking process and preventing the bottoms. Moisture buildup can soften the texture, so allowing airflow helps maintain crispness. Wait until they are fully cooled – assuming patience lasts that long.
Store
If you somehow manage to have leftover cookies, proper storage is essential to maintain their soft and chewy texture. Exposure to air will dry cookies out rapidly.
Once the cookies are 100% cool to the touch, transfer them to an airtight container. If you stack them, place a sheet of parchment paper or wax paper between the layers so they don’t stick together. Good Food Remedies Pro-Tip: To keep your cookies tasting like they just came out of the oven for days, place a small piece of plain white sandwich bread into the container with the cookies. The cookies will magically draw moisture from the bread, keeping them incredibly soft, while the bread itself turns hard as a rock! Stored this way at room temperature, your cookies will stay fresh for up to 5 days.
FAQs about Chocolate Chip Cookies
Q: Why did my chocolate chip cookies turn out flat? A: Flat cookies are usually the result of butter that was too warm or soft. If your butter is melting before it goes into the oven, the cookies will spread rapidly. Flat cookies can also happen if you used too little flour, or if your baking soda is expired. Always ensure your butter is at “cool room temperature” (it should yield slightly to a gentle press, but not be greasy or melting).
Q: Can melted butter be used instead of softened butter? A: Melted butter completely changes the structure of the cookie. While softened butter, when creamed with sugar, creates a light, cakey lift, melted butter creates a denser, chewier, and flatter cookie. Some recipes specifically call for melted browned butter for flavor, but for this recipe, stick to softened butter for the perfect thickness and texture.
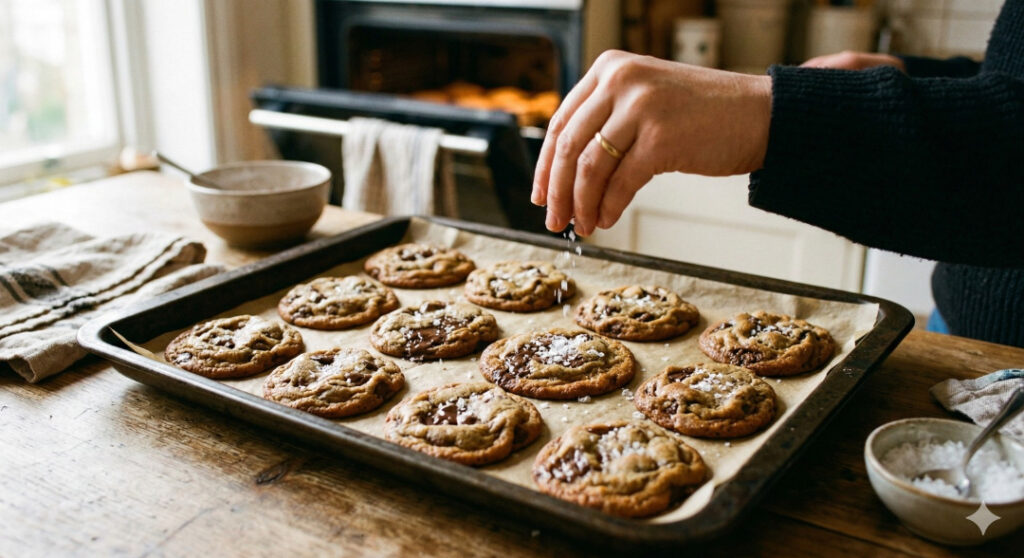
Q: Why do you add flaky sea salt on top?
A: Sea salt is the ultimate flavor enhancer. Chocolate chip cookies are inherently very rich and sweet. A light sprinkle of flaky sea salt on the warm cookies immediately after they come out of the oven provides a gorgeous salty-sweet contrast. It cuts through the richness of the dough and makes the deep chocolate notes explode on your palate.
Q: Should the dough need to be cooled?
A: It is highly recommended to let it cool but You don’t have to. Even 30 minutes in the fridge solidifies the fat, preventing excessive spreading. If you have the patience to chill the dough overnight (up to 24 hours), the flavor profile deepens remarkably, resulting in a gourmet, bakery-style taste.
Q: What is the difference between light brown sugar and dark brown sugar in cookies?
A: Brown sugar is just white sugar with molasses added back into it. There is higher molasses content in dark brown sugar compared to light brown sugar. Using dark brown sugar will give your cookies a richer, more caramel-forward flavor and a slightly softer texture because of the extra moisture. You can substitutably use them based on your choice!
Q: Why are my cookies tough instead of chewy?
A: Toughness usually comes from overmixing the dough once the flour is added. Overmixing develops the gluten in the flour, making the texture elastic and bready. Mix your dry ingredients in just until the flour streaks disappear.
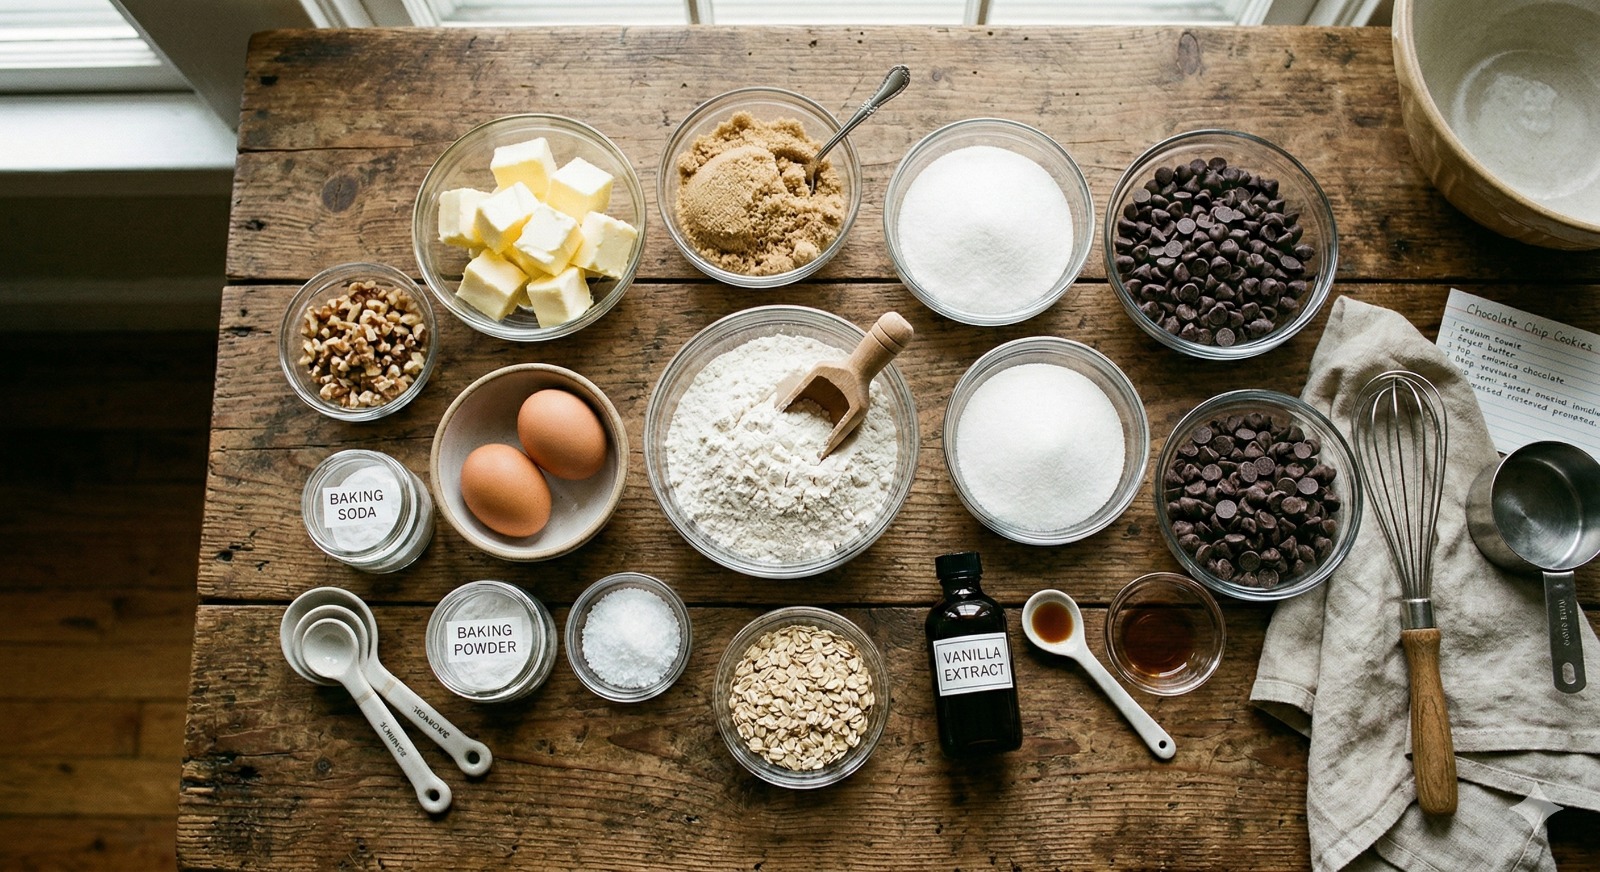
The Best Chocolate Chip Cookie Recipe: Ingredients & Substitutions
To execute the best chocolate chip cookie recipe, you need to understand the building blocks. The quality and specific types of ingredients you use will dramatically impact the final result.
1. All-Purpose Flour: This is the standard base. It provides the right amount of protein (gluten) to hold the cookies together without making them too dense. Substitution: For a chewier cookie, you can replace half of the all-purpose flour with bread flour, which has a higher protein content. If you need a gluten-free option, use a high-quality 1:1 gluten-free baking flour blend that contains xanthan gum.
2. Butter: Unsalted butter is preferred so you can control the sodium level. The fat provides richness, tenderness, and flavor. Substitution: If you only have salted butter, simply reduce the added salt in the recipe by half. For a dairy-free cookie, use a high-quality vegan butter stick (not the spreadable tub kind, as it contains too much water).
3. Sugars (Granulated White & Dark Brown): A blend of the two matters most. White sugar helps the cookies spread and crisp up on the edges. Brown sugar provides moisture, chewiness, and a deep molasses flavor. For the best chocolate chip cookie recipe, we use a slightly higher ratio of brown sugar to white sugar to ensure a soft center.
4. Eggs: Baked goods hold together because of eggs. Moisture comes from them, also the shape. We use one whole egg and one extra egg yolk. The extra yolk adds supreme richness and chewiness without the drying effect of extra egg white.
5. Vanilla Extract: Vanilla is to baking what salt is to savory cooking—it enhances all the other flavors. Always use pure vanilla extract, never imitating vanilla essence.
6. Leavening (Baking Soda): Sodium bicarbonate, strictly known as baking soda (don’t accidentally grab baking powder!), is an alkaline compound. It reacts with the slight acidity of the brown sugar, creating carbon dioxide bubbles that lift the cookie. Browning receives support through its contribution, Ensure your baking soda is fresh; test it by dropping a pinch into a splash of vinegar—it should fizz vigorously.
7. Chocolate: Do not skimp here! The word chocolate is in the name, after all. Ditch the waxy, low-quality chips and opt for high-quality semi-sweet chocolate. We recommend using a mix of chocolate chips and roughly chopped chocolate bars. The chopped bars create varying sizes of chocolate—some melt into the dough, while others remain intact, creating pockets of gooey joy.
8. Sea Salt: Both fine sea salt in the dough and flaky sea salt on top of the dough are essential. The fine salt balances the overall sweetness, while the flaky sea salt on top hits your tongue directly, lifting the full moment of taste.
More of our favorite cookie recipes!
If you love this recipe, you will want to explore the rest of the dessert archives here at Good Food Remedies. Baking cookies is a therapeutic activity, and we have a flavor profile for every craving:
- Double Dark Chocolate Fudge Cookies: For the ultimate chocoholic, these cookies use Dutch-processed cocoa powder in the dough and are stuffed with white chocolate chips for a beautiful color contrast.
- Classic Snickerdoodles: Soft, pillowy, and rolled in a heavy coating of cinnamon sugar. The secret ingredient? A touch of cream of tartar for that signature tang.
- Oatmeal Pecan Raisin (or Chocolate Chip) Cookies: Thick, hearty, and comforting. The toasted pecans add a beautiful crunch to the chewy oat base.
- Peanut Butter Blossom Cookies: A holiday classic that is delicious year-round. A soft peanut butter cookie crowned with a solid chocolate candy kiss.
- Lemon Crinkle Cookies: Light, bright, and refreshing. These beautiful, powdered-sugar-coated cookies burst with fresh lemon zest and juice.
The Best Chocolate Chip Cookie Recipe Ever
Here it is—the meticulously tested, scientifically sound, absolutely irresistible recipe. Gather your ingredients, preheat that oven, and get ready to experience cookie nirvana.
Equipment
- Stand mixer or electric hand mixer
- Large and medium mixing bowls
- Silicone spatula or wooden spoon
- Measuring cups and spoons (or a digital kitchen scale for ultimate accuracy)
- 2 large baking sheets (light-colored aluminum is best)
- Parchment paper or silicone baking mats
- Cookie scoop (2 or 3-tablespoon size)
- Wire cooling rack
Ingredients
- 2 ¼ cups (280g) All-purpose flour (spooned and leveled)
- 1 teaspoon Baking soda
- 1 teaspoon Fine sea salt
- 1 cup (2 sticks / 226g) Unsalted butter, softened to room temperature
- 1 cup (200g) Dark brown sugar, tightly packed
- ½ cup (100g) Granulated white sugar
- 1 Large egg, at room temperature
- 1 Large egg yolk, at room temperature
- 1 tablespoon Pure vanilla extract
- 2 cups (340g) Semi-sweet chocolate chips (or a mix of chips and roughly chopped dark chocolate bars)
- Flaky sea salt, for sprinkling on top after baking (e.g., Maldon)
Instructions
- Prep the Dry Ingredients: In a medium-sized mixing bowl, whisk together the all-purpose flour, baking soda, and fine sea salt until well combined. Set aside.
- Cream butter together with sugars inside the bowl of a standing mixer that holds a paddle tool (or in a large bowl using an electric hand mixer), combine the softened unsalted butter, packed dark brown sugar, and granulated white sugar. Beat on medium-high speed for 2 to 3 minutes, scraping down the sides of the bowl with a silicone spatula as needed, until the mixture is noticeably paler in color, light and fluffy.
- Add Wet Ingredients: Slow down the speed of the mixer to medium-low. Start with a whole egg and stir it until combined. Then, add the egg yolk and the pure vanilla extract, mixing just until the liquid is fully incorporated. Process without excessive force at this stage.Using a spatula clear down the base and sides of the bowl.
- Incorporate Dry Ingredients: Turn the mixer down to its lowest speed. Gradually add the flour mixture into the wet ingredients in three additions. Mix only until the flour streaks just begin to disappear. Stop the mixer early if you have to; it is better to finish the mixing by hand than mixing too long using the appliance should be avoided.
- Fold in the Chocolate: Using a sturdy wooden spoon or rubber spatula, gently fold the chocolate chips (and chopped chocolate, if using) work the ingredient through the mixture until uniform in texture.
- Chill the Dough (Highly Recommended): Cover the bowl tightly with plastic wrap and chill the dough, leave it in the fridge no less than half an hour, or up to 24 hours. (If chilling longer than 2 hours, let the dough sit at room temperature for 15 minutes before scooping).
- Preheat and Prep: When ready to bake, preheat your oven to 350°F (175°C). Parchment paper goes on two big baking trays.
- Portion the Dough: Using a cookie scoop, portion the dough into balls (about 2.5 to 3 tablespoons of dough each). With your palms, roll each one a few seconds until round. Smooth shapes come fast that way. Bake space lets each one breathe on the sheet you set up earlier. Two inches between keeps them from touching as they open wide.
- Bake: Bake in the center rack of the preheated oven for 10 to 12 minutes. Remember the golden rule: pull them out when the edges are golden brown but the centers still look slightly soft, puffed, and underbaked.
- Salt and Cool: Immediately upon removing the baking sheets from the oven, sprinkle the tops of the hot cookies with a pinch of flaky sea salt. Allow the cookies to cool and set on the hot baking sheet for exactly 5 minutes.
- Transfer: Use a thin spatula to transfer the cookies to a wire rack to cool completely.
Pair it with a full glass of icy milk, straight from the fridge.
Notes
- Measuring Flour: If you do not have a digital kitchen scale, make sure you use the “spoon and level” method for your flour. Using a fork, lift the flour inside the jar to loosen it. Slide a spoon slowly into the cup until full. Run the flat edge of a butter knife across the top to even the surface. Scooping directly with the measuring cup packs the flour in, leading to dry, crumbly cookies.
- Butter Temperature: Softened butter should dent slightly when you press it with a finger, but it should still hold its shape and feel slightly cool. If it is greasy and warm, put it back in the fridge for 15 minutes.
- Baking Sheets: Dark-colored baking pans absorb more heat and can cause the bottoms of your cookies to burn once the tops start to soften. Always opt for light-colored aluminum pans for even baking.
Nutrition
(Note: Nutritional values are approximate and based on 1 cookie out of a 24-cookie yield).
- Calories: 215 kcal
- Carbohydrates: 27g
- Protein: 2g
- Fat: 11g
- Saturated Fat: 7g
- Cholesterol: 25mg
- Sodium: 140mg
- Potassium: 75mg
- Fiber: 1g
- Sugar: 18g
- Calcium: 20mg
- Iron: 1.5mg
![What to Eat at Night to Lose Belly Fat [12 Sleep-Friendly Snacks]](https://www.goodfoodremedies.com/wp-content/uploads/2026/03/12-healthy-late-night-snacks-what-to-eat-at-night-to-lose-belly-fat.jpg-768x419.png)